What’s Up, Cool Kids! Let’s Talk Water Cooling
Hey there fellow tech enthusiasts! Are you tired of your CPU overheating every time you use your PC for intense gaming or video editing? Well, have no fear because water cooling is here! Water cooling has been around for quite some time and has been adopted by many PC enthusiasts as a way to keep their computer temperatures at bay.
In this guide, I’ll be taking you through the process of water cooling your PC step by step, highlighting the intricacies and opinions from experts of the craft. This guide will include everything you need to know, from choosing the right components to testing and troubleshooting your water cooling system.
So, let’s get started with a basic overview of what water cooling is and why it might be the right choice for you.
Why I Think Water Cooling is the Way to Go
When it comes to PC cooling, there are a lot of different options out there. But for me, water cooling is the clear choice, and here’s why:
First of all, water cooling is extremely efficient. Unlike air cooling, which relies on fans to disperse heat, water cooling dissipates heat through a much larger surface area. This means that water cooling can cool your components much more effectively, even at higher loads.
Secondly, water cooling is much quieter than air cooling. Fans can be extremely loud, especially if you’re using high-performance ones to keep your components cool. But with water cooling, the only sound you’ll hear is a gentle hum from the pump and the trickle of water flowing through your system.
Thirdly, water cooling just looks cool. There’s no denying that a fully-watercooled PC is an impressive sight to behold. If you’re someone who takes pride in the aesthetic of your build, water cooling is definitely the way to go.
Lastly, water cooling can actually improve the lifespan of your components. By keeping everything running cool and reducing the likelihood of thermal throttling, you can help ensure that your hardware lasts for years to come.
Overall, I believe that water cooling is the best option for anyone who wants to keep their PC running cool, quiet, and looking its best. While it may require a bit more effort to install than air cooling, the benefits are well worth it in my book.
Choosing the Right Components: The Key to a Successful Water Cooling System
Now that I’ve decided to install a water cooling system in my PC, it’s important to choose the right components to ensure its success. It can be overwhelming to browse the vast selection of components available, but some considerations can make the selection process easier.
First and foremost, I need to determine the right size of the radiator for my PC, as radiators come in varying lengths and thicknesses. The size of my case and the number of components I want to cool will determine the right radiator size for my system. I also need to decide between a single or multiple radiator setup, as the latter is more complex but offers better cooling efficiency.
Next, I need to choose the type of water block for my CPU and GPU. Different manufacturers offer different types of blocks, including universal, full coverage, and custom blocks. It’s imperative to choose the right blocks that fit my components and provide efficient cooling.
Another crucial aspect of choosing the right components is selecting the right pump and reservoir. The pump’s flow rate is essential in choosing the right pump as it determines the amount of coolant that flows through the system. The reservoir, on the other hand, is responsible for holding the coolant and ensuring there’s always enough coolant in the system.
Lastly, I need to choose the right fittings, tubing, and coolant for my system. The right tubing material and size play a significant role in effectively cooling the system. There are also different types of fittings available that can affect the system’s overall performance and aesthetics. The cooling system’s coolant type is also crucial in preventing corrosion, bacteria, and algae growth that can affect the system’s performance and longevity.
Choosing the right components requires a significant investment of time, energy, and money. However, it’s a critical step in ensuring my water cooling system works effectively and lasts for a long time. I need to research and consult experts before making my selections and ensure they fit my budget, style, and performance needs.
Ready, Set, Prep! Tips for Preparing Your PC for Water Cooling Installation
Before diving into installing water cooling components into your PC, it’s important to take some time to properly prepare your beloved rig. Trust me, you don’t want to rush into it and end up causing irreversible damage to your system. Here are some expert tips for ensuring a smooth and successful water cooling installation.
Clean Your PC
First and foremost, you need to give your PC a thorough cleaning before beginning the installation process. Dust and debris can clog up your fans and radiators, leading to poor cooling performance and even damage to your hardware. Use compressed air, a soft brush, and a microfiber cloth to gently clean all areas of your PC, including the CPU cooler and GPU fans.
Disconnect and Organize Cables
Now is the time to disconnect all cables from your PC, including the power supply and any external devices. Take the opportunity to organize cables and zip tie them neatly to prevent a tangled mess later on. It’s also a good idea to label each cable so you don’t accidentally unplug something important during the installation process.
Remove Any Obstacles
Before starting the installation, make sure you have enough space to work comfortably and freely. Remove any large objects from your work area, and clear some space on your desk or table for your tools and components. You don’t want to accidentally knock something over and damage your hardware.
Double Check Compatibility
Make sure all the water cooling components you purchased are compatible with your PC’s hardware, including the CPU socket type and motherboard size. Check the manufacturer’s website or the product’s packaging to ensure you have all the necessary components and tools for the installation process.
Be Patient and Take Your Time
Finally, it’s essential to take your time during the installation process. Rushing through it can lead to errors and damage to your components. Follow the manufacturer’s instructions carefully, and don’t be afraid to double-check when you’re unsure about something.
Remember, preparation is key to a successful water cooling installation. Take your time, be patient, and enjoy the process!
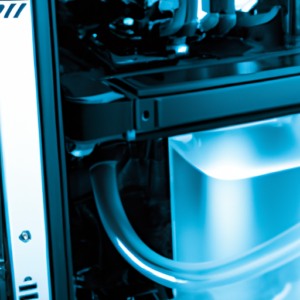
5. Installing the Components
Alright, it’s time to get down to business and install those water cooling components! First up, we need to attach the radiator to your PC case. Make sure you have the right screws and figure out the best placement for your setup. I find that placing the radiator at the top of the case with the fans pulling air out is the most effective.
Once the radiator is secured, it’s time to connect the tubing. This can be a bit of a tricky process, so take your time and make sure you have the right size tubing for your components. Start with the tubing that goes from your CPU block to the radiator, and then move on to the rest of the components. Use zip ties or clamps to secure the tubing in place.
Next, it’s time to fill up the reservoir and pump with coolant. This part can get messy, so make sure you have some paper towels on hand. Slowly pour the coolant into the reservoir and turn on the pump to circulate it through the system. Keep an eye on the level of coolant and add more as needed.
Lastly, connect the fans to the radiator to help keep everything cool. Make sure the fans are blowing air out of the case to maximize the efficiency of the system.
Don’t forget – testing and troubleshooting are crucial steps in this process. Run some benchmarks and monitor your system temperatures to make sure everything is running smoothly. And if you encounter any issues, don’t hesitate to reach out to the water cooling community for help. Happy cooling!
Testing and Troubleshooting
Alright folks, the moment of truth has arrived – let’s test that water cooling system and see if it’s working! First things first, make sure everything is properly connected and secured. Turn on the power and start monitoring the temperatures. If everything looks good, give it a whirl and put your PC through the wringer—if it can handle a heavy workload without getting too hot, then congratulations on a successful install!
If you notice that things aren’t running smoothly, first make sure that everything is plugged in and seated correctly. The next step would be to check the coolant levels in the reservoir – sometimes the pump is just sucking air. If everything is full, but the temperatures are still higher than expected, consider cleaning the loop or checking the thermal paste on the CPU – maybe it needs a reapplication.
Another pro tip is to run everything outside of the PC before putting it back inside. It’s a lot easier to troubleshoot when you can see everything at once. If you have a leak, this is the perfect time to catch it before it gets water everywhere.
Remember, this is a complicated install, and even the most experienced builders can make mistakes. Don’t be too hard on yourself if you run into issues. Just keep a level head and troubleshoot one step at a time, and soon you’ll be enjoying a cool and quiet system!
We’re all wet now!
Well, that was quite the adventure! If you made it all the way through this guide on water cooling, congratulations – you’re officially an expert! I hope I was able to impart some useful advice and make the process a little less intimidating.
One thing to keep in mind is that water cooling isn’t for everyone. If you’re happy with your PC’s performance as it is, or if you’re not comfortable with the risks involved, it’s perfectly fine to stick with air cooling. But if you decide to take the plunge, be patient and take your time. This isn’t something you want to rush through.
Remember, there’s always a chance of something going wrong, so keep an eye on your system and be prepared to fix any issues that arise. And above all else, enjoy the enhanced performance and quiet operation that comes with a well-executed water cooling setup!